버튼을 통해서 화면에서 클릭을 하고 컨테이너를 통해서 한 화면을 구성하고 있는 앱들도 많지만 최근에 많은 앱들은 손가락을 드래그해서 화면을 제어하는 구성을 많이 사용하고 있는 것 같습니다.
구글에서 리스트뷰라고 치면 아래와 같은 이미지들이 표기가 되네요.
이런 것을은 수직 방향으로 내리는 리스트뷰 (ListView)라고 볼 수 있습니다.


그렇다면 가로로 구성할 수있는 리스트뷰 (ListView)는 없을까요?
당연히 없을리가 없죠.
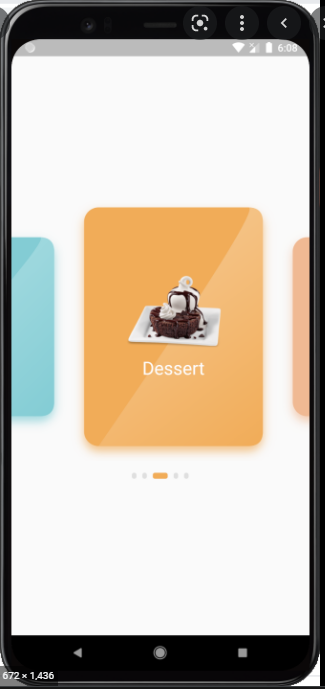
아래와 같이 구성되는 가로로 드래그해서 보고싶은 내용을 확인하는 기능도 리스트뷰 (ListView)로 구현합니다.
그럼 한번 구현을 해보도록 하겠습니다.
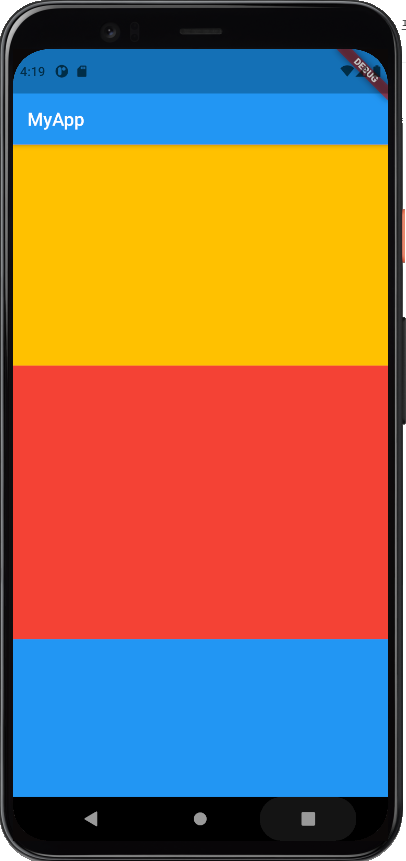
import 'package:flutter/material.dart'; void main() { runApp(MyApp()); } class MyApp extends StatelessWidget { // This widget is the root of your application. @override Widget build(BuildContext context) { return MaterialApp( title: 'Flutter Demo', theme: ThemeData( // This is the theme of your application. // // Try running your application with "flutter run". You'll see the // application has a blue toolbar. Then, without quitting the app, try // changing the primarySwatch below to Colors.green and then invoke // "hot reload" (press "r" in the console where you ran "flutter run", // or simply save your changes to "hot reload" in a Flutter IDE). // Notice that the counter didn't reset back to zero; the application // is not restarted. primarySwatch: Colors.blue, ), home: Scaffold( appBar: AppBar( title: Text('MyApp'), ), body: ListView( children: [ Container( width: 5, height: 300, color: Colors.amber, ), Container( width: 300, height: 300, color: Colors.red, ), Container( width: 300, height: 300, color: Colors.blue, ), ], ), ), ); } } | cs |
초심플한 코드를 사용해서 리스트뷰를 만들어 봤습니다.
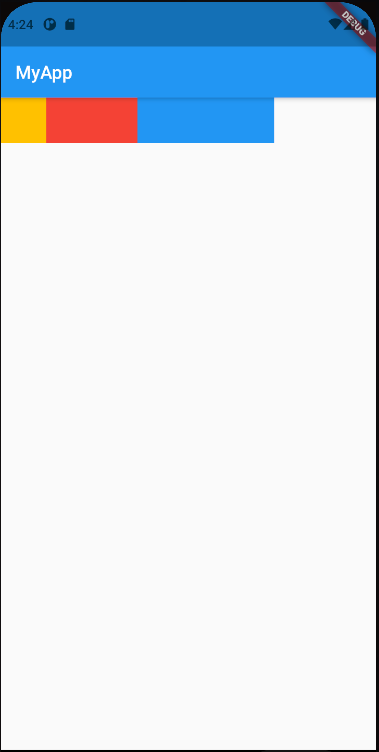
그 다음으로는 가로로 스크롤을 할 수 있도록 설정해봤습니다.
그리고 화면의 전체를 차지하지 않기 위해서 리스트뷰를 컨테이너로 감싸봤고, 컨테이너 하나가 앱의 한 화면을 구성할 수는 업시에 Column 위젯으로 덮어씌워봤습니다.
import 'package:flutter/material.dart'; void main() { runApp(MyApp()); } class MyApp extends StatelessWidget { // This widget is the root of your application. @override Widget build(BuildContext context) { return MaterialApp( title: 'Flutter Demo', theme: ThemeData( // This is the theme of your application. // // Try running your application with "flutter run". You'll see the // application has a blue toolbar. Then, without quitting the app, try // changing the primarySwatch below to Colors.green and then invoke // "hot reload" (press "r" in the console where you ran "flutter run", // or simply save your changes to "hot reload" in a Flutter IDE). // Notice that the counter didn't reset back to zero; the application // is not restarted. primarySwatch: Colors.blue, ), home: Scaffold( appBar: AppBar( title: Text('MyApp'), ), body: Column( children: [ Container( height: 50, width: 300, child: ListView( scrollDirection: Axis.horizontal, children: [ Container( width: 50, height: 300, color: Colors.amber, ), Container( width: 100, height: 300, color: Colors.red, ), Container( width: 500, height: 300, color: Colors.blue, ), ], ), ), ], ), ), ); } } | cs |
그러면 아래 화면과 같이 하나의 컨테이너 내부에서 리스트가 구현이 됩니다.
다음 번에는 리스트뷰에 적합한 리스트타일 (ListTile)을 활용해서 조금 더 깔끔한 리스트뷰를 구현해보도록 하겠습니다.
'플러터 > 위젯 (Widget) 실습' 카테고리의 다른 글
| Flutter 공부하기 - Navigator 추가학습 (Initial Route 및 routes 관련) (5) | 2022.05.16 |
|---|---|
| Flutter 공부하기 - 비동기 프로그래밍 (Future, Async, Await) 기초 및 예제 #1 (4) | 2022.05.15 |
| Flutter 공부하기 - Navigator 위젯을 통해 화면 전환하기 #1 (3) | 2022.05.13 |